Unifi-Controller with NPM

This is another post of my Homeserver Project series but this time, we are doing some networking and subnetting too. Since I'm building my home setup from scratch, with some previously Raspberry Pi's, I want everything I already use or want to use in one server, not seperated. Well the reason is the performance increase too, since the Unifi-Controller on a Raspberry Pi feels kinda slow to me.
In this case, I'm moving my already running Unifi-Controller on my Raspberry Pi to my new home server. So let's go:
Prerequisites:
- Docker installed
- Docker Compose installed
- NPM installed
- Portainer installed
- Basic network knowledge (Subnetting and just knowing your own network, atleast you've set it up by yourself right?)
Hardware I use, but not nescessary:
- Ubiquiti USG
- POE 8 Port switch
- AccessPoints AP-Lite
- New Home Server running Ubuntu 22.04.2 LTS, hardware by choice
This topic or kind of tutorial is kinda niche. I've had to look everything up since there is no 100% fitting tutorial for this. This might be the case for you too with this tutorial since any network is different. I can just give you a direction but the rest is up to you. Sorry in advance!
If you are just here to deploy your own Unifi-Controller just follow Step 1...
Step 1: Build and deploy Unifi-Controller with Portainer and Docker Compose
- Access Portainer and add a new Stack and give it a name. f.e. Unifi
- Copy and paste the recommended docker-compose.yml configuration from docker-hub. I modified my config like this:
version: "2.1"
services:
  unifi-controller:
    image: lscr.io/linuxserver/unifi-controller:latest
    container_name: unifi-controller
    environment:
      - PUID=1000
      - PGID=1000
      - TZ=Etc/UTC
      - MEM_LIMIT=1024 #optional
      - MEM_STARTUP=1024 #optional
    volumes:
      - /opt/containers/unifi/data:/config
    ports:
      - 8443:8443
      - 3478:3478/udp
      - 10001:10001/udp
      - 8080:8080
      - 1900:1900/udp #optional
      - 8843:8843 #optional
      - 8880:8880 #optional
      - 6789:6789 #optional
      - 5514:5514/udp #optional
    restart: always
3. Create the folder on your system (ssh into your machine)
mkdir /opt/containers/unifi4. Build and deploy the stack
5. Your container should be up and running after a while
Step 1.1: Add Firewall rules (optional)
If you are using a firewall like Firewalld (ufw), which I highly recommend, you have to allow the ports from above to make the Controller accessible. Especially for the inform URL + port 8080 which Unifi uses to provision and discover new devices.
ufw allow 8443
ufw allow 3478/udp
ufw allow 10001/udp
ufw allow 8080
ufw allow 1900/udp
ufw allow 8843/udp
ufw allow 8880
ufw allow 6789
ufw allow 5514

ufw reload
Step 2: Network configuration for Unifi-Controller
Well this needs some further explanation I guess. At least you should know your network really good, otherwise this will be a pain. In my case, I'm having my home server wired to my management network which is the native VLAN with the subnet 192.168.1.0/24.
That's because I want all my services running in this subnet instead of the client subnet or worse, in the Guest subnet. But as I said before, this might be different to your setup. I try to cover a multiple VLAN network configuration here but don't hate me if something doesn't work as explained.
Scenario 1: Multiple VLANs
As I said, you maybe have your home server wired to your client network. Something like 192.168.100.0/24 and use your unifi-controller on management subnet 192.168.1.0/24 too. This is where 802.1q trunk bridge mode comes to your help. WTF is that you might ask? You'll hopefully understand in a minute.
Since you want to use multiple networks on one pyhsical ethernet interface you need to "trunk-port" your interface. Which basically means you are making 2 interfaces (or more) out of 1 physical interface.
So I assume you do have multiple VLANs set up within your Unifi network like:
- Client VLAN ID 100 - 192.168.100.0/24
- Guest VLAN ID 200 - 192.168.200.0/24
- Management Native VLAN 1 (default) - 192.168.1.0/24
In that case, Unifi creates a network profile called "All" by default which includes all VLANs from above, including the native VLAN. So whereever your home server is plugged in, navigate to the designated switch in the Unifi GUI and open the "Port Management" to configure this specific port to the profile "All".

Keep in mind, that your home server should be configured with DHCP on. Otherwise you will kill your connection. If DHCP is on, your system should get an IP by your DHCP Server (USG) and show up in your Client-Devices menu in your current Unifi GUI with a management IP (Native VLAN, Subnet 192.168.1.0/24).
Scenario 2: Native VLAN configuration
Because I'm going to place my home server in my management VLAN (native VLAN1 - Subnet 192.168.1.0/24) this will be a little bit easier to configure. I'm planning on deploying all future containers in that subnet too but still be able to deploy all further containers in different subnets like VLAN 100 or VLAN 200 with portainer if needed.
Since I decided to do it this way, I don't need to configure the interfaces in a certain way because the main interface should get it's IP by my DHCP-Server (USG) out of the native VLAN 1 with an IP out of the subnet 192.168.1.0/24.
But how do we deploy a container on a different subnet? Well, as I mentioned above, I only configured the port, where my home serer is plugged in to, to the network profile "All". So the port will accept all other configured VLAN ports on my machine which will I add via Portainer.
Step 3: Add (sub)network with Portainer
- Access Portainer
- Go to Network
- Add Network
- Choose a Name for the network
- Driver: macvlan
- Parent network card: Your network card name (look up with "ip a" or "ifconfig")
- If you are using Scenario 1 with multiple VLANs, your should name your network card something like this "eth0.100" for VLAN 100. Which whill create a new MAC for this new connection in docker.
- If you are using Scenario 2 just use your parent network card name
- Enable manual container attachment
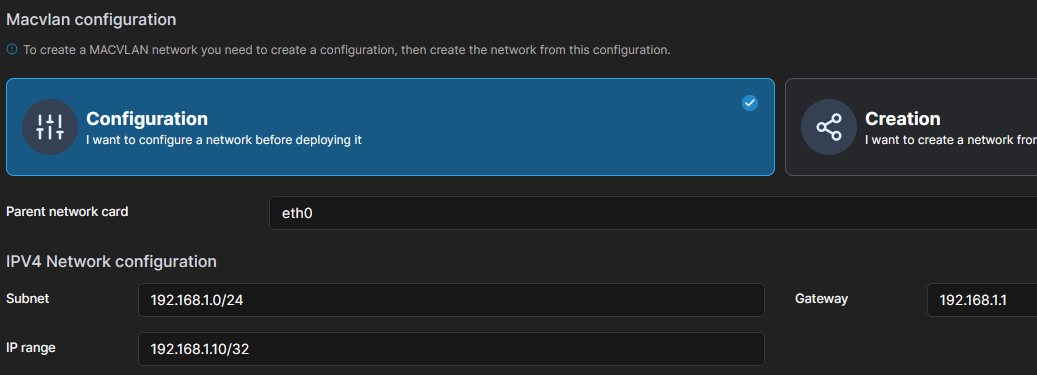
Now we need to specify the network configuration:

Further explanation:
- Subnet: Your subnet depends on your Unifi configuration but I assume its like in the picutre: 192.168.1.0/24
- Gateway is usually on 192.168.1.1
- IP-Range means the range you want a container to choose it's IP from. If you are using 192.168.1.10/32 this means the container can only get 1 IP address which will be 192.168.1.10.
- You can use a subnet calculator if you want to add multiple containers to this network. I chose this configuration:

This means, all to this network added containers will get an IP in the range from 192.168.1.8 to 192.168.1.11. In this case you can ignore the Gateway and Broadcast IP since this is part of an already existing subnet with a given Gateway and Broadcast IP. We only define the range for the containers to choose their IP from.
Now you add another Network:
This is optional and not tested properly. Try add the new network from above to your container and try yourself. Otherwise come back and try this:
- Access Portainer
- Go to network
- Add network
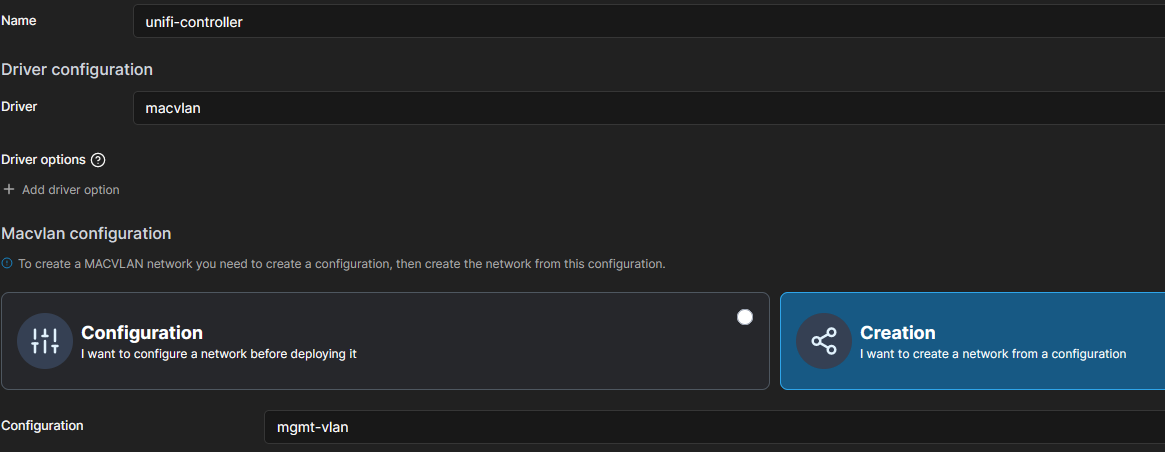
- Choose a Name: unifi-controller
- Driver: macvlan
- This time, you can choose "Creation" as Macvlan configuration. Click that!
- Select your previously added network
- Create the network

Step 3.1: Manually add networks
If you want to add the additional interfaces manually you can Access your system via ssh and add some VLAN interfaces like in this tutorial.
NOTE: Not tested!
docker network create -d macvlan --subnet 192.168.1.0/24 --gateway 192.168.1.1 -o parent=eth0 unifi-controller

docker network create -d macvlan --subnet 192.168.100.0/24 --gateway 192.168.100.1 -o parent=eth0.100 mymacvlan100

docker network create -d macvlan --subnet 192.168.200.0/24 --gateway 192.168.200.1 -o parent=eth0.200 mymacvlan200
Enough configuration and networks, let me show you how to add the Unifi-Controller already...
Step 4: Add Unifi-Controller container to network
As above said, I wanted you to know that all further configuration could be different to your specific setup, since we are going to deploy the controller on a sub-interface. I chose to do it that way, to have a different IP address for my controller instead of the home server IP address.
Now since we have created a network in portainer for this, we add the new network to our Unifi-Controller container.
- Portainer Gui
- Go to Containers
- Go to unifi-controller
- At the top, click "Duplicate/Edit"
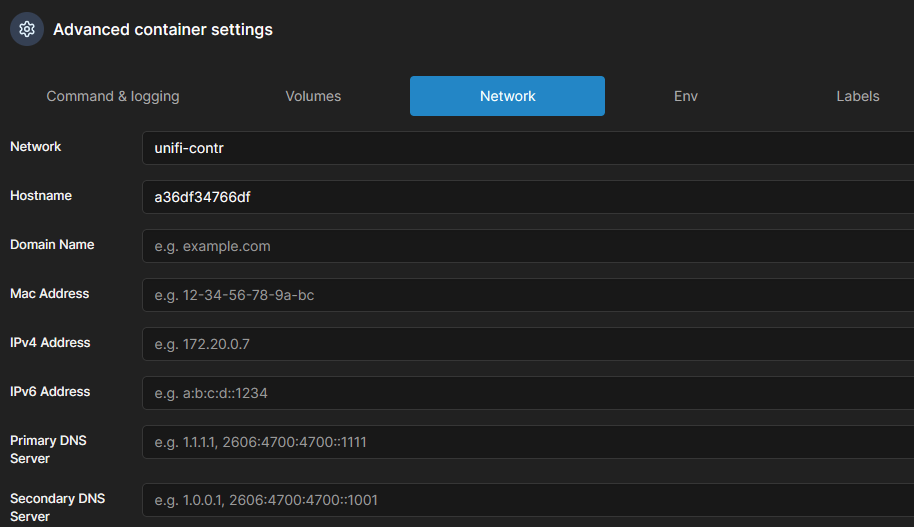
- Scroll to the bottom and open the tab "Network" and add our new macvlan network to the container: "unifi-controller"
- Deploy the container

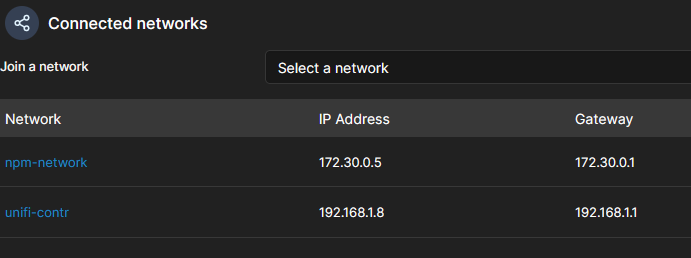
After the container was deployed again, scroll down to network and join the network: "npm-network"
It should look like this:

Since we've all done that, we should see the home server and mapped containers with IPs out of their subnets in Unifi. If that's the case, you've done everything right to this point. If not, you might check your network configuration or try restart your system to obtain the IPs. Repeat this step for all your VLANs if needed. The multiple VLAN part is just theory, I didn't try that.
Step 5: Add Controller to NPM-Network
As you saw in the picture above, I already added the container to my npm-network to make it accessible via NPM with valid certificates. If you don't have this network, you should take a look into my last post about NPM.
In this last post I've already shown you, how to add a proxy host to your NPM. Anyway, add the new proxy host and point it to:

As Hostname use the name of the container and don't forget the CNAME record in PiHole if you have one or your DNS-Server of choice.
Pew, you are at the end. Good job! Hope this works for you.
